Showing posts with label knitting. Show all posts

Wednesday, 25 January 2017

Knitting tips: Knitting with Linen

In an endeavour to have more knitwear to wear during the summer I knit two linen pieces this season. I went stash diving and found the sweater lot of Quince & Co. Sparrow that I had bought at least a year ago and I made Pam Allen's Perkin's Cove jumper. Then just last week I finished knitting a lovely cocoon of a shrug by Bristol Ivy called Bridie in Quince & Co's aran weight linen, Kestrel. Both of these garments are lovely to wear and they will definitely feature prominently in my summer wardrobe in the years to come.

I hear many people wonder what it is like to knit with linen yarn and I am by no means an expert, but here are some of my observations.

Linen is a plant fibre so it is smooth like cotton and it will not felt. However, because of the smoothness of the fibre it does also share the cotton's characteristic of having no bounce in the yarn. Unlike wool and many other animal fibres that have crimpy strands that will give the yarn bounce and memory, the plant fibres' smoothness will pretty much feel flat and "dead" in the hand. For some knitters, working with such fibres tend to cause their hands to hurt. After working two garments in linen I am ready to give my hands a rest from plant fibres and get back into some incredible woolly wools. 

In preparation for knitting with the linen yarn I was advised to hand wind the skeins. The lack of crimp in the yarn is just more suited to hand wound balls but that is not to say if you are short on time that you cannot knit from a cake that had been wound on a ball winder.


To try to avoid the stiffness in my hands I read Elizabeth Doherty's guest blog post on the Quince & Co. site. She suggests to ease up the tension and to go down a needle size or two so that you don't have to pull as tightly to achieve gauge. I did this with the Bridie project and tried hard consistently maintained a relaxed tension but I find the muscle memory in my hands often just take over when I get into a knitting rhythm and when I finished the pieces I had a little freak out moment when my knitting was much smaller than the suggested size pictured in Bristol's schematic. 

But here is how linen can shine. It is an incredibly strong fibre and can withstand some vigorous blocking. So I blocked the heck out of the Bridie and left it to dry over a weekend; I was not going to take it off the mats until it was bone dry. Because there is no crimp in the fibre once it is dry that shape is pretty much set until the next time it gets wet unlike wool which can I have noticed will gradually bounce back to it's preblocked state in some for or another. After blocking the Bridie cocoon, the size was much closer to the intended size and now it fits perfectly. I believe by blocking it the pattern has opened up a bit and it has resulted in a lovely drape to the garment.


When I was knitting the Perkin's Cove pattern with the Quince & Co. Sparrow yarn I found that my finished object was a bit wide and the stitches were looking a bit uneven and sloppy. So when I blocked that jumper I pulled it down to elongate the stitches and bring in the width. Stretching out the stitches lengthwise also helped to tidy up the elongated stitch pattern by evening it all out. Again I let it dry until it was bone dry and the linen has pretty much stayed in place.

Much of what I have read about linen knits emphasises how machine washing and tumble drying the yarn will soften it and give it more drape. I am yet to test this because I do not own a tumble dryer. I did however throw the Bridie shrug into the washing machine and that withstood the process. Linen, like cotton will not felt and is strong enough to take some rough treatment.

Both pieces have been such lovely layering garments for me to wear over the past month. I am so pleased with them both and next summer I will definitely have another linen knit on my needles. Maybe I'll play around with some Isager Bomulin next time.

Further Reading:
As mentioned above, Elizabeth Doherty's tips on the Quince & Co. blog are very help so do take a look. Another worthy read for knitting with linen is Hannah Fettig's post about finishing linen knits. Check it out here.

Links to my Ravelry project pages for my Bridie and Perkin's Cove.

Wednesday, 4 January 2017

Knitting tips: When you get stumped with a pattern instruction

Somehow I've ended up with the wrong stitch count at the shoulders on the front and I'm stuck.
We've all been there before and no matter how experienced a knitter we are we all experience the same rise of panic and frustration when we find a point in our project where we cannot proceed any further. 

You may have just realised that the pattern instructions and your actual knitting doesn't match up. You believe that you have followed EVERYTHING to the tee and you just don't know why this has happened. Or you had been happily chugging along with your knitting until you've reached a point in the pattern that is confusing or unfamiliar to you.

If you're like me, this usually happens late in the evening and I end up obsessing over it trying to work it out to fix the problem before I am able to go to bed. Which in reality probably doesn't help the situation at all and really a sleep and a fresh set of eyes is the possibly the most prudent approach.

Having experienced this panic and frustration many many times I have sat down and thought of a few suggestions for how to move forward.

1. I find all my patterns off Ravelry these days so that is often my first point of reference. I will look at the pattern page to see if the designer has posted any errata links or comments about tricky bits in the pattern. After that I look through the projects that other Ravelry users have made from the same pattern. This wonderful community is full of many generous and wise makers who diligently write up thoughts, modifications and problems they encountered. If there is an error in the pattern's instructions it would undoubtedly be picked up on by more than one knitter. The helpful ones will also provide details on how they moved forward from the problem or what they did to modify the pattern to their liking. I am eternally grateful for those benevolent knitters who freely share their wisdom and I do try to do likewise with my Ravelry project notes.

2. My current project, Annie Rowden's Polka Dot Tunic hasn't got many projects on Ravelry and so unfortunately there are no helpful notes from other makers. I am at a point where my knitting is not matching up to what the pattern instructions say. I am stumped but I am not at a loss. Many independent designers are willing to provide pattern support for their designs. They are dedicated to their fan base and will usually provide some kind of contact means for questions and feedback. In this case I have written an email to Annie and I hope to hear back in the near future. I'll let you know what happens...*

3. Sometimes you just need someone in real life to help you nut through a problem and a trip to the LYS is just what you need. At Sunspun we regularly have people popping in need of help with a project and we are all ways happy to take a look and spend a bit of one on one time nutting it out. We always try our best to send people off ready to keep knitting and on their way towards a beautiful finished project.

I hope you'll be able to knit problem free, so happy knitting.

UPDATE: My email to Annie has been replied and she has clarified everything. Turns out the pattern has errors and she will be updating the parts that I pointed out to her. I'm a bit chuffed to have made a contribution to this pattern and aided a designer. This is just another thing I love about the modern knitting community.

Monday, 2 January 2017

2017: Blog Reboot

Happy New Year! 2017! 
It's a new year, so why not reboot the blog. Rather than dwell on what went wrong last year I'm just going to look ahead and set my goals for the year ahead.

Slowing down and simplifying life is one thing that is pressing on my thoughts right now. I want to be able to enjoy the moments and the process rather than try to rush through to the finished object or the destination. I'm aiming to take the pressure of myself stop trying to achieve unrealistic goals or to make everything that catches my eye. So the goals will be less extensive and detailed this year and kinder to myself.

I've come to accept that "Stash Less" is just not for me. I know I really should but I can't especially since I started working at my LYS, Sunspun and I'm surrounded by such attractive yarns on a regular basis. I am a stash enhancer but maybe I should turn that into a strength and write more often about the spectacular skeins of yarn that cross my path and find their way into my stash. So you can look forward to some more yarny thoughts this year on the blog.

I want to spend more time on my sewing machine. The growing fabric stash will be a new area of attention for me. I have been collecting and dreaming of building my handmade wardrobe and I really need to just apply myself to making it a reality. I also want to make more items for my children so that they can wear at least one piece of handmade everyday.


Some knits that I definitely want to make this year:

Little Wave cardigan by Gudrun Johnston. I want to knit this for my husband for our 10 year anniversary this year. 

Isadora Lopapeysa by Kate Gagnon Osborn. This will be for my boy because I want to knit a stranded colourwork sweater and a kids sized one is the best place to start.

Pictured above is what I'm working through right now. It's Annie Rowden's Polka Dot Tunic for my girl but I'm considering changing the bottom of it because I predict that a white "skirt" bottom will definitely return from kinder very dirty. I'm knitting this with my last 200g skein of Tarndie 8ply and some lovely squishy Wool Days Scout and I think of it as my "All Australia" project because both these exquisitely woolly wools are traceable to two single farms in Australia. Both yarns have fabulous stories behind them; take a look through their websites if you want to know more or wait till I post up a yarn review.


For myself, there are too many jumpers, cardigans, shawls, cowls and etc. in my making dreams. I will probably just let the fibre speak to me and choose projects based on which yarns I want to play with next. Like that Blacker yarns Cornish Tin II that is pictured at the top of this post. I keep wanting to squish (and sniff) it and I'm thinking it will be a lovely yarn to use for a Rocquaine from Pom Pom 18.

Please share your making goals in the comments. Happy making in 2017. 

Sunday, 26 June 2016

Tips for problem free travel knitting


This little notions kit of mine takes care of all my knitting needs while on the go.
Recently when we were preparing for an overseas family holiday a few well meaning friends who were aware of my knitting addiction expressed concern for the likelihood of being able to get my knitting needles through airport security. Having travelled before, both internationally and domestically with my knitting I did not share their doubts. There was not a single bat of the eye when my bags went through the x-ray for scanning and I didn't even feel the need to preempt the security officers to the fact that there was knitting in my bag this time round.  By all means I'm not trying to set myself up as an expert on this topic but I thought it might be useful to share my tips so that other knitters can enjoy their knitting abroad too.

Beyond the purpose of getting through airport security I also have some general tips for keeping your knitting portable for crafting on the go.

1. Use circular knitting needles.
I use circular knitting needles all the time even when working flat because I find them more comfortable because the weight of the work sits more centrally in front of me and doesn't give me as much shoulder strain. I also like using them because I am a chronic public knitter and circulars are easier to tuck into a project bag and not stick out like straight needles do. 

2. Use wooden or bamboo tips.
The debate is still on with whether you can get through the security screen with metal tips so to avoid any issues I just stick to using wooden or bamboo needles.

3. Have yarn on the needles already cast on.
I do this so that it is more convincing to the security officers that I am a legitimate knitter and that I'm not planning on using my needles as weapons.


4. Bring a Clover yarn cutter pendant.
If you think you must cut your yarn then this nifty little yarn cutter works a treat and is not a problem through security. I just had it in my notions pouch with all my other little nick nacks and there were no issues.

5. Knit smaller projects.
Hauling around a large sweater project is just not practical when travelling so knit something small like an accessory or socks. If you must knit a sweater then try just doing the sleeves while you are on the go.

6. Bring enough yarn to last the whole trip and factor in the possibility for delays.
It happened to me once, on the way to Sydney our flight got cancelled and we were stuck a the airport. Initially I didn't mind because i had my knitting and then I ran out of yarn. The delay quickly became unbearable and it also meant that I didn't have anything to knit on the way home too. Now, I make sure I wind up all I need for the whole project and also bring more than one thing to work on.


7. Knit with yarn appropriate to the destination climate.
We were holidaying in Singapore and I knew that working a thick woolly project was a ridiculous thing to do. Hence I brought along nice little lace weight project and knit away happily by the pool as my children played.

8. Keep digital copies of the patterns.
I load a copy of the pattern onto all of our devices so that I still have access to the pattern even when my kids are monopolising the iPad.

9. Choose an easy pattern.
My preference is for a fairly plain knit that won't require too much brain work, I am on holidays after all. Travelling with children often involves sitting in the dark hotel room waiting for a child to fall asleep and knitting st st is what I can manage in those circumstances. I'm sure more experienced knitters will be more advanced than me when it comes to knitting in the dark but I like to keep it simple.

10. Bring a self addressed prepaid postage satchel.
If you are nervous about getting your knitting needles through security then bring a prepaid satchel so that you can post the project to yourself. Aim to head through security early so that if there was an issue you will have enough time to put your knitting in the post satchel and find a post box before trying again with security. If you still hope to work on the project while away then I recommend using interchangeable tips on your circular needles so that if you did encounter a problem you only need to post the tips back to yourself. Then when you get to your destination you have the fun of finding a LYS to pick up some new tips and some new yarn too. However, with this tip, please keep in mind that when leaving a foreign country for the homeward journey you will need to investigate what their local postage options are before heading to the airport.

There you go, nicely rounded out to 10 tips. I'm sure all you seasoned travel knitters out there have many other tips that I haven' even considered. Please leave a comment and share your wisdom.

Sunday, 5 June 2016

Finished object file: Puntilla Sweater | Skein Merino Cashmere Fingering

This is the kind of pose you end up with when your 6YO gives the directions. He thought that I could best show off the lace by holding my hands this way.
Here's another finished object for a couple of months ago but I have been wearing it so much since I finished it and it is certainly one of my current wardrobe favs. I'm talking about the Puntilla sweater designed by Joji Locatelli that I knit for the recent Skein Sweater KAL that Kristen hosted through her Ravelry group.

When Kristen first announced that she was going to offer a preorder sale for sweater lots of her yarn I was immediately hooked. I started obsessing over her colour ways and bases and dreaming of the different sweaters I could make. Then Kristen announced that she was also going to host a sweater KAL starting in May just around the time the preorders were due to be sent out. This totally sent me down the Ravelry rabbit hole. I ummed and ahhed over two patterns initially but every time I logged onto Ravelry I started adding more patterns to my short (long) list.

'Milk Glass' is a beautiful colour way but it was not quite what I expected.

Finally, I decided to make Joji Locatelli's Puntilla sweater from her recently released Authentic Collection. From the Skein update I ordered 4 skeins of MCN Sock in the 'Milk Glass' colour way on a whim because the photo of the colour looked like a soft neutral with subtle splashes of pastel purple and bluey grey. When the skeins actually arrived and I started swatching with the yarn I realised that the colour way was much deeper and variegated then I had expected. I kept looking at my swatch and I kept thinking, "I love these colours, it looks amazing." However, something still nagged at me in the back of my mind about the colour and only after I had cast on and started knitting the shoulders did I finally admit to myself that I just didn't love the colour way when I was knitting it in st st. I was troubled by just how variegated it was and I didn't feel comfortable wearing that blend of colours in a sweater that was predominately knit in st st. Luckily, I had some Skein Merino Cashmere (MC) Fingering in 'Graphite' in my stash and so I frogged what I had knit with the 'Milk Glass' and started all over again. 

The knit went fairly quickly after I got past the shoulders and the short row shaping for the neckline. I had never knit a Joji pattern before and her shoulder construction method was a style that I had never tried before either. But all credit to Joji for writing such clear instructions, because it was not tricky at all and I was surprised that in a relatively short amount of time I had a neck hole and a pair of shoulders.

It's hard taking photos in the yard without the dogs getting in the way.
Those dogs are still there in the background.
Once I had the arms holes done and had joined the work in the round I buzzed through the st st body. I knit the sleeves on short circulars, which has become my favourite method of small circumference knitting (BTW, I use 20cm Addi turbos for that) and then I finished the neck ribbing with an invisible ribbed bind off to give it a bit more stretch. Bang, the main body of the sweater was done and I was onto the lace trims. 

Here is where the 'Milk Glass' came back into play. I decided that though I didn't like the colour way in st st I was going to love it knit in lace. So I picked up the the stitches around the ribbed ends of the sweater and knit the easy to memorise lace in the beautiful 'Milk Glass' colour. I adore the little touches of mauve and bluey grey that peak through in the lace trim. I love how the lace sits at the end of my sleeves and at the bottom of the sweater giving it a touch of femininity to an otherwise boxy and androgynous garment.

I like this pattern over Joji's very popular Boxy sweaters because it is not as wide in the body and the added lace trims just gives it something a little special for the everyday. Hence this top has been my favourite one to wear as our weather has turned colder and colder in Melbourne. The MC Fingering is just so soft and cuddly, so when the weather wasn't so cold I would wear a singlet underneath and the yarn was so divine against the skin. Now that it is colder the generous boxy style of the jumper means that I can still wear it comfortably over my layers.

Thanks to Kristen from Skein for hosting such a fantastic KAL and for the awesome prize.

And, as an added bonus I won a prize from the KAL. Kristen announced me as one of the winners at the end of the KAL and she awarded me a Kimi Silks project bag. I am extra chuffed that on top of having a gorgeous new sweater to wear I won something in the KAL. Who would have thought I'd be so lucky?

Friday, 27 May 2016

Finished object file: Agate sweater | Quince & Co. Tern

Again, food was used to coerce the child to cooperate.


This one I finished a while back in March for my girl's birthday. Miss L turned 3 and this has been the perfect layering piece for her this season.

Agate is from Quince & Co.'s Lost Coast collection, a collection of children's patterns designed by Ashley Hurst. Inspired by California's Lost Coast the collection is made up of warm and cosy looking pieces that would keep the little ones snug.


I knit the pattern with the called for yarn, Tern from Q&C because I loved it when I used it from the Immie Tee that I knit for Miss L when she was a bub. The yarn is a wool and tussah silk blend and though it is a fingering weight (4ply) yarn it knits up pretty quickly. I love the muted tones that it dyes up in which gives in my opinion gives the kids' knits a bit of a sophistication. For this knit I used the terracotta colourway because I was so drawn to the sample pictures and I knew that it would be a colour that would go well with jeans and with the pinks and reds in Miss L's wardrobe.


It knit up so quickly and I had it done well before Miss L's birthday. The lace panel was easy to memorise and since the front was just stockinette stitch knit in the round I just buzzed through it. However, it was not until I finished did I realise that the lace panel didn't finish correctly. I analysed my knitting and I am pretty certain that I knit it exactly as the chart instructions but the eyelets don't line up properly. I was tempted to frog the bottom of the jumper and to reknit it. I thought about it over and over but in the end I told myself to embrace the mistake; also, I had some other knits that I was keen to get started on so I let that one go.


I tried to contact the designer and to point out my suspected errata but I have yet to hear back from her. Since I have moved on from this knit I haven't been too overly hung up about it. However, in case you decide to knit the pattern I would end knitting the main lace panel after rnd 4 and then continue knitting the panel end chart.

Ultimately, Miss L doesn't know any different and she loves it. Since her birthday I have put her in it a lot because it was a handy layer to throw on during the cooler Autumn mornings.

Monday, 15 February 2016

Finished object file: Campside Shawl | Nunnaba Artisan Yarn Gradient


One of the great knitting moments in life are when you finish a project and it becomes an immediate favourite wardrobe item. My recently finished Campside Shawl designed by Alicia Plummer is one of those items. I have been wearing this shawl a lot and it's just a delight.

The pattern for this shawl was offered as a free pattern on the Pom pom Magazine blog about a year ago and you can access it here. The post also shares Alicia's story of what inspired her in the design for this shawl. Campside is reminiscent of her childhood summers spent at a family cabin. For her the pattern connects with her memories of comfort, warmth and shelter. It is a deeply personal story but one that resonates with all and when I wear my Campside I feel wrapped in soft comforting wool and it warms my heart.

The pattern has a few issues making it challenging to follow but nothing that an experienced knitter can't work out. It only has charts for the eyelet lace pattern and sometimes the lack of written instructions can leave you making some deductive leaps with the knitting. Basically there are some points in the charts where you could deduce that an extra eyelet and decrease is missing but you can also knit it as charted too and it doesn't really affect the overall look of the shawl. I figured at the end of the day, this was offered as a free pattern, I shouldn't get too uppety about errors. 


For this great wardrobe staple I used some deliciously soft high micron merino from White Gum Wool that had been hand dyed by Nunnaba Artisan Yarn into a gradient colourway called 'Blue Jay'. When I ordered this yarn I requested that the gradient colours be spread over the 300g as a long gradient. I didn't want to receive 3 skeins of standard gradient dyed yarn because that would make a bigger project slightly more challenging. 

When a gradient comes in a single skein all the colour transitions are contained in that single length of yarn. This poses the challenge of finding the perfect pattern to match with the yarn; where all colours will be utilized. If you find a small project that requires approximately the same yardage as one skein of the yarn then perfect, you'll get all the colours and no leftovers. However, when you do this you might find yourself limited to small projects like kids garments or hats because you won't have enough yardage to make anything bigger. 

Over time I have figured out a few ways to work larger projects with gradients, so here are my suggestions. One way is to alternate skeins of the gradient and depending of how many skeins you are prepared to juggle you can double, triple, (or even more) your yardage. 

Another idea is to add on skeins of the trim colour. The trim when a dyer offers a semi solid colourway that is the same as the outside colour of the gradient skein. When knitting, you get to the end of the gradient but need more yardage you can continue knitting in the trim colour so that the colour transition is not interrupted. 

If the trim option is not available you can just use the gradient as a feature and then finish off the pattern with a neutral colour. For example Kelly Brooker's Conscious pattern is designed with gradients in mind. The yoke can be knit out of a gradient and then the rest of the pullover is finished off with something else.


Then lastly, there is what I did with my Campside project; specifically ordering a long gradient so that the colours were spread across the whole 300g of yarn. It made knitting this shawl so much easier because I had one large cake of yarn to knit through that needed no alternating or changing of colours. 

There is so much to love about this shawl and I must say the result is exactly what I wanted. What I have achieved here has helped me be less afraid of working with gradients and given me many ideas for how to tackle similar projects in the future.

What experience do you have with knitting with gradient yarns? Have you tackled the challenges differently? Do share your thoughts and tips.

Monday, 18 January 2016

Finished object file: Sawmill River Hat | Brooklyn Tweed Loft


I finished this hat about a week ago but with the busyness of kids at home on summer holidays I haven't had much time to think about blogging.

This Sawmill River Hat by Bonnie Sennott was a spot of selfish knitting that gave me the opportunity to have a play with Brooklyn Tweed's Loft (fingering weight) yarn. Just before Christmas, Yarn + Co., a LYS in Melbourne got in a shipment of BT and to my knowledge they are the only Australian stockists of this much sought after yarn. I was quite beside myself with excitement and didn't hesitate to pick up a few skeins as a Christmas present for myself.

When it came to picking a pattern for this gorgeous yarn I wanted a single skein project and something with cables. Bonnie Sennott's hat pattern fit the bill exactly I even went with the sample colour, Hayloft.

When swatching with the loft the yarn broken as I was casting on with the long tail method. I had read that this yarn due to it's woollen spun nature was very delicate and this break just confirmed that. So my first few rows were knit quite gingerly for fear of breaking the yarn again. Once I got going I was more confident and familiar with the feel of the yarn in my hand so that nervousness disappated.

In my hand the yarn felt rustic but not itchy. It is a lovely tweedy yarn spun from  American grown Targhee-Columbia wool. I don't know much about this breed but I must say the wool is a delight to wear against the skin. At first touch it may not feel very appealing especially to knitters who are mostly merino users. It does not have that same squishiness of merino wool but when you look closely at the strand it is clear that it is undoubtedly soft, lofty and delicate. 

Shortly after I cast on this project I was browsing around Bonnie's Ravelry group page and noticed that she was hosting a 'Selfish knitting KAL'. My project met the requirements of the KAL; being a new project cast on in the new year, it was one of Bonnie's patterns and I was knitting it for myself. I joined in the chatter and was quite excited that I was ticking off my goal of attempting more KALs this year. I finished well ahead of the cut off date and I just enjoy watching and commenting on my fellow knitters' progress now. There is also a pretty good prize on offer but I don't think my chances of winning it are pretty high.

Such well defined cables from the BT Loft.

I did make a few modifications to the pattern and you can read my project notes from my Ravelry page here.

I liked knitting with the BT Loft and I really enjoyed the cables of the pattern. I am happy that I have another soft and snuggly hat ready for me in the winter and now that I've experienced this highly talked about yarn, I'm dreaming of more projects that I can make with it.

Wednesday, 23 December 2015

Yarn review: Skein Meadow

Recently I knit with Skein's new base, Meadow to make my Sibella pullover. I finished the pullover last week and got the chance to wear it this week when the cool change swept in to break the first burst of summer heat in Melbourne. As this is a new base for Skein I wanted to put some thoughts out there about the yarn.

When Kristen, owner and dyer of Skein yarns announced on her FB page that she was trying out a new sport weight non-superwash merino base I jumped onto her shop straightaway and snapped up four skeins of the Meadow dyed in 'Ice on the Windowpane'.


When the yarn arrived I was in love. My first impressions were that it was soft and squishy and the yarn had a nice twist in it so I expected it to be sturdy and suitable for a sweater project. I also noticed that the colour was a softer more muted variation of the colourway and concluded that the rawness of the fibre (having not been subjected to the superwash process) meant that it wouldn't take on as much dye in the dyeing process. I was not disappointed by this fact because the muted colourway is still just as beautiful.

When I swatched with the yarn I saw that the yarn had good stitch definition - crisp and consistent stitches in both stockinette and garter stitches. Then I blocked the swatch and even with some squishing of the swatch I noticed that small sections of it remained that dry look. This meant that the yarn was still a bit water repellant, possibly due to some traces of lanolin still being in the fibre. I was falling more and more in love with this yarn with each step and I couldn't wait to actually start knitting a project with it.

When I was knitting my Sibella pullover I decided to alternate the skeins to ensure there would be no colour pooling. Kristen recently wrote a very clear blog post about why it is important to alternate skeins when knitting with hand dyed yarns. She also made an easy to follow video tutorial for alternating skeins when knitting in the round. You can find both post and video here.


Now that I have been wearing the pullover for a couple of days I have noticed a bit of pilling in the underarm area, but that is to be expected with woollen fibre that has not been superwashed. It just means that it will need an occassional brush with my lilly brush or some other depilling device. I am by no means disappointed with the yarn because it is the type of wool that deserves a little bit more TLC.

Meadow is a base that suits knitters who prefer soft merino in it's true form. It will need handwashing and the occassional depill. It will also dye up into softer tones of the luscious Skein palette. It is definitely one of my new favourite yarns.

Thursday, 17 December 2015

Blocking, what is it and why do we do it?

Pinning the lace yoke of my newly finished Sibella pullover will open up the lace a little more.


Mats and strong pins are the basic blocking essentials.
Blocking is another one of those things that knitters talk about and nobody else knows what it is. It is also one of those things like gauge swatching that often get skipped and you can be a knitter for many many years and not actually know what blocking (or swatching) is.

Basically blocking is what you do when you wet a piece of knitting and then you lay it out to dry. Sometimes the piece of knitting will require a bit of shaping and pinning in order to pull it into the shape and size that the pattern has indicated that it should be. 

There is a saying that "blocking fixes all problems", while this is not entirely true it does fix some things. One of the benefits of blocking is that by gently manipulating the wet knitting you can even out any tension discrepancies and help the stitches look more consistent. It is also essential with lace work to block the piece afterwards in order to open up the lace so that it will show properly.

Some yarns will not show it's full nature until it has been wet blocked. Some fibres will bloom after they have been wet and that simply means that the yarn will kind of puff a bit after it has dried from being wet. This blooming can affect the gauge of the knitted work and also the crispness of the pattern design particularly when colour is involved.

There are many different blocking techniques and each piece will require a slightly different treatment. However, here is a description of my standard blocking process. I will fill a bucket with water and put a little bit of wool washing detergent in it. I will let the knitting soak for at least 30 minutes to allow all the fibre to properly absorb the water and be saturated. After soaking I will gently squeeze the water out of the knitting; never treat handknits roughly for the risk of felting. Then I will roll the knitting up in a towel to remove excess water.

Lace blocking wires are especially useful when trying to achieve a straight edge on your knitting.
T Pins and wires.
Then I will pin the piece out on a foam mat; either a camping mat or a yoga mat. Sometimes I will also use lace blocking wires to obtain a really straight edge or to pull the lace open with a consistent tension. The pins I use are strudy 'T' shaped craft pins and the lace blocking wires are a set that I bought from my LYS, Sunspun.

I will leave the wet knitting pinned out to dry in a warm spot in the house or outside in a shaded spot. I make sure that the knitting is bone dry before I will remove the pins and wires otherwise the knitting will not maintain the shape or size that you pinned it out to. However, even this does not mean that the sizing and shaping is permanent. I have noticed in particular that no matter how meticulously I blocked my shawls that gradually they kind of scrunch up again. In fact, everything will need to be re-blocked each time it is washed, so I guess when those shawls are scrunching up it is just time for a quick wash and reblock.

I hope that gives you all a basic understanding of what blocking involves and why we do it. Now you can keep me accountable and avoid lazy knitter behaviours by asking me if I've blocked my finished projects before wearing them adoringly.

Thursday, 24 September 2015

Finished object file: Miss L's wardrobe

Miss L in her new handmade wardrobe items: Quaintly top and Gathered Skirt.
This week I've been relishing in the joy that comes with accomplishing my first sewn garment. I am such a sewing newbie so even though the project was the simplest of patterns I am over the moon with joy at the completed object.

I made the Gathered skirt for all ages from the Purl Bee blog. I was instantly drawn to this skirt because of the large pockets featured on the sides and I also love the simple style of the skirt that makes it an everyday kind of item. Another bonus is that the blog provides instructions for sizes 2 year old to an adult 46" hip size. I remember when I originally came across the pattern months ago I shared it with the comment, "I can see myself making this skirt in every size for Miss L." and now after making my first one for her it is very possible that she really will always have one in her wardrobe throughout her life.

As with my knitting, if I am going to make something with love I am going to make it with materials that I love. For this skirt I went on a lovely fabric adventure to The Fabric Store in Fitzroy and selected some chambray for the main fabric and a very cute printed cotton as a contrast for the pockets.


I just love the simple beauty of chambray for everyday wear.
As a newbie I made some mistakes, like not sewing the waistband straight so there is a point where the band is too narrow for the elastic to sit flat so it is folded over. I also had to do the basting stitches twice because I didn't pay attention to the instructions and did them incorrectly the first time. And I wouldn't look too closely at the hem because I'm pretty sure that's not straight either, but despite all these imperfections I am so happy with it. The fabrics are just so beautiful and the pockets are fab.

When I showed Miss L she exclaimed, "So cute!". She very happily put it on and she twirled so excitedly throughout the day.


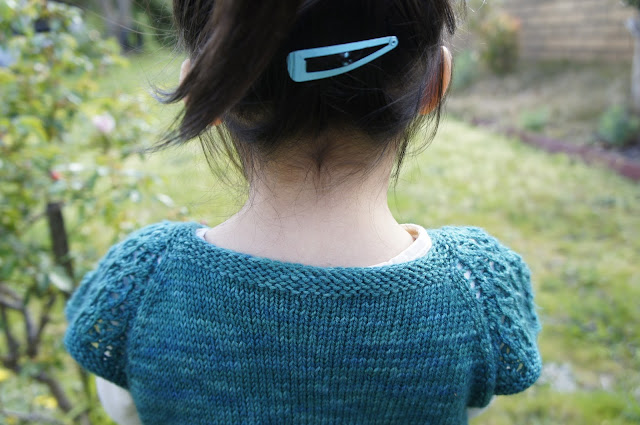
These little lacy cap sleeves are so beautiful and easy to knit too.
It has been a good week for Miss L's wardrobe because I also finished knitting a Quaintly top in fingering weight (4ply) hand dyed Miss Click Clack yarn. This yarn is such a beautiful colour and it was her own choice. We went to The Handmade Show market in Glen Huntly a few months ago and Miss L picked up this skein of yarn from Kelly's bargain bucket that was sitting on the ground. She did the cutest thing when she grabbed the yarn, she hugged it to herself because it was clear that she loved the squishy softness and the colour. I bought it always intending to make something for her with it and the Quaintly was perfect. It is such a lovely spring top with little lacy cap sleeves and a stockinette stitch body which I knit with extra length to make it a bit tunic like. My project notes can be found here.

Kelly Brooker of Peka Peka Design Studio designed the Quaintly pattern. The pattern is available individually but if you get the ebook you get a set of patterns for the fingering (4ply), DK (8ply) and worsted (10ply) weight and sizes all the way from newborn through to 10 years old. If you're like me and you like to keep you options open in terms of yarn choice then having the pattern written up in the three different yarn weights is great. I have already knit this pattern before in the DK weight in the 18-24 month size and it was a super quick knit. The fingering weight knit went pretty quickly too and I made the 2 year old size with the one skein of Miss Click Clack Merri Creek sock yarn.

The pattern instructions are simple enough to follow and even the fiddly bit of changing between two different needle sizes to finish the sleeves is explained very clearly and not difficult at all. I ended up just slipping the sleeve stitches onto a DPN in the smaller size (2.75mm) and kept everything else on the circular needle. When I came to the sleeve stitches I just held the circular needle aside and knit the sleeves with another DPN of the same size. 

To top of this gorgeous knit Miss L picked out some adorable little sheep buttons from Sunspun during their Spring sale last week. These very cute buttons come from a company called Incomparable Buttons. They are not plastic, so I'm guessing they are ceramic and they are handmade in South Africa through a programme that gives employment to women. These little buttons are so precious and make the perfect finishing touch to a lovely top.


The cutest little ceramic sheep buttons ever.

Miss L is a lucky little girl with her growing handmade wardrobe and her enjoyment of the clothes bring extra joy to both of us. Now, it's time to for us to twirl together.